


Getting Started
Farming Guide
Farming Guide Cloud · Farming · Automation Modes Farming sends marches to gather resources automatically. Choose your tile types and levels, how many…
このガイドはまだ日本語に翻訳されていないため、英語で表示しています。
このページの内容
Farming Guide
Cloud · Farming · Automation Modes Farming sends marches to gather resources automatically. Choose your tile types and levels, how many marches to dedicate, and which troops and generals to send. Set up Farming in the Cloud dashboard, then use Scan map while idle or iScout to find tiles.
Enable Farming
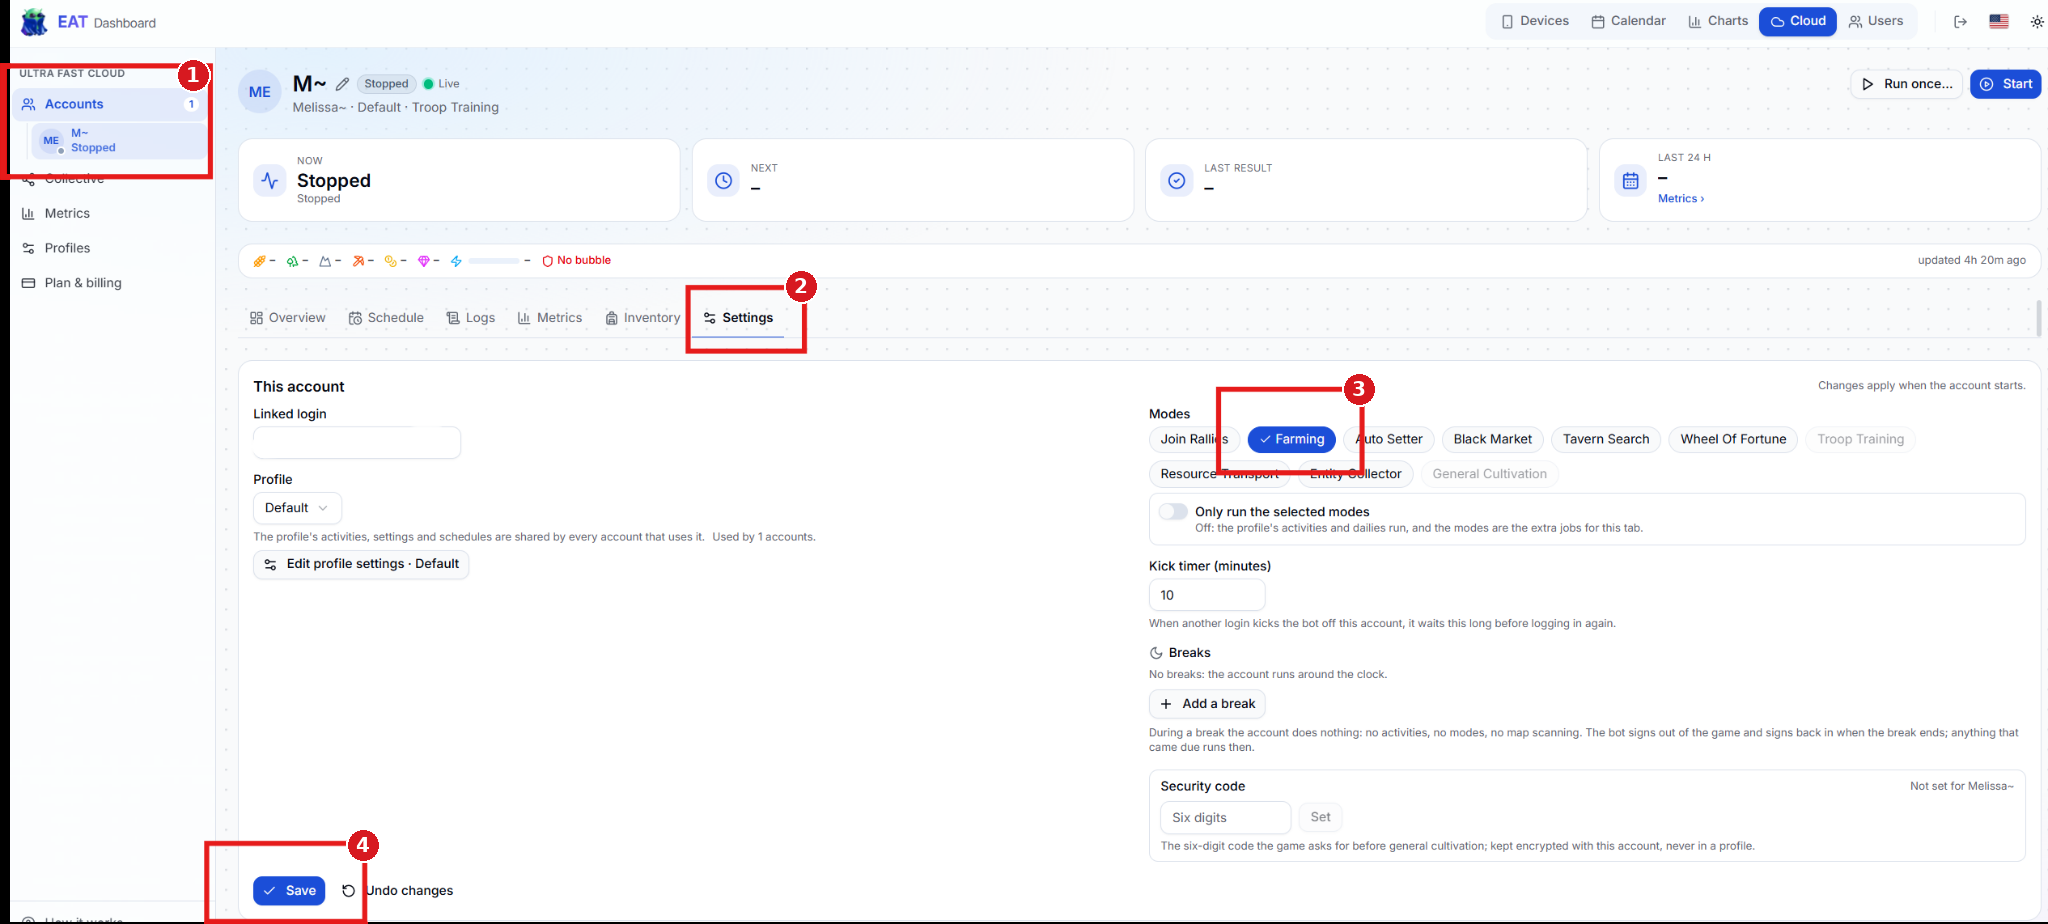
Accounts — In Cloud → Accounts, select the account you want to farm with.
Settings — Open the account’s Settings tab.
Farming — Select Farming under Modes.
Save — Save the account settings. Changes apply when the account starts. Configure the profile below, then start the account.
## Set up tiles, marches, and generals
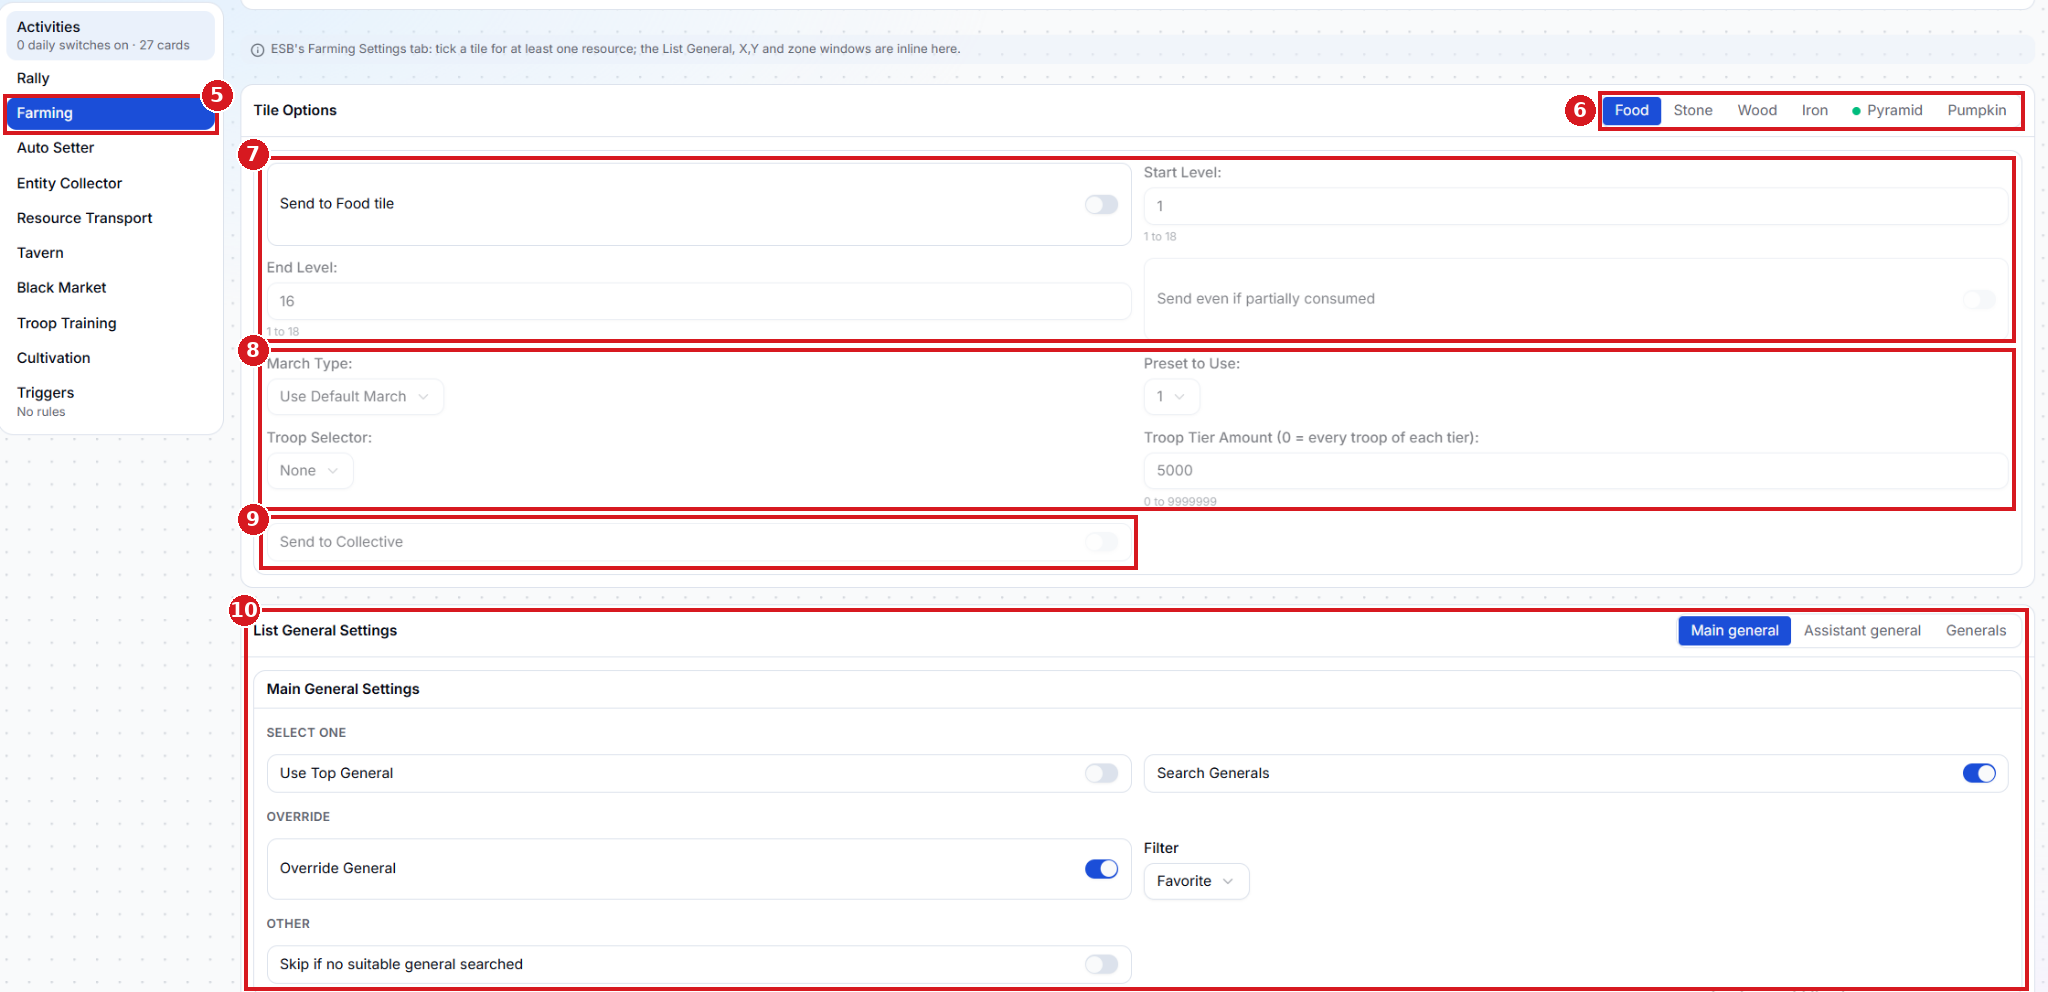
Farming profile settings — Open Edit profile settings from the account’s Settings, then select Farming in the profile sidebar. Every account using this profile shares these settings.
Tile type — Select a tile tab to configure that type. The tabs shown are Food, Stone, Wood, Iron, Pyramid, and Pumpkin.
Tile levels and partial tiles — Enable Send to [type] tile for at least one tile type. Set Start Level and End Level for each enabled tile type. Turn on Send even if partially consumed to allow tiles that have already been partly gathered.
March and troops — Choose Use Default March for Evony’s default march, or select a preset and set Preset to Use. Use Troop Selector to choose how troops are sent.
Troop selector What it sends None The troops from the selected march. Power First The highest-power troops first. One Troop One low-power troop. Full Tiers The quantity set in Troop Tier Amount for each troop type and tier. Enter 0 to use every available troop of each tier. Send to Collective — Enable this to share tiles found by the account with other accounts using the same Collective tile key. To check which key an account uses for Farming, open Collective keys in its assigned profile and look beside Tiles.
List General Settings — Configure the Main general and Assistant general separately. Open Generals to manage the names used by Search Generals.
- Use Top General picks the top eligible general. Search Generals looks for the selected names.
- Filter narrows the choices. For example, Favorite limits the search to favorite generals.
- Override General lets Cloud replace the general already selected in the march.
## Set the search area, march limit, and SvS options
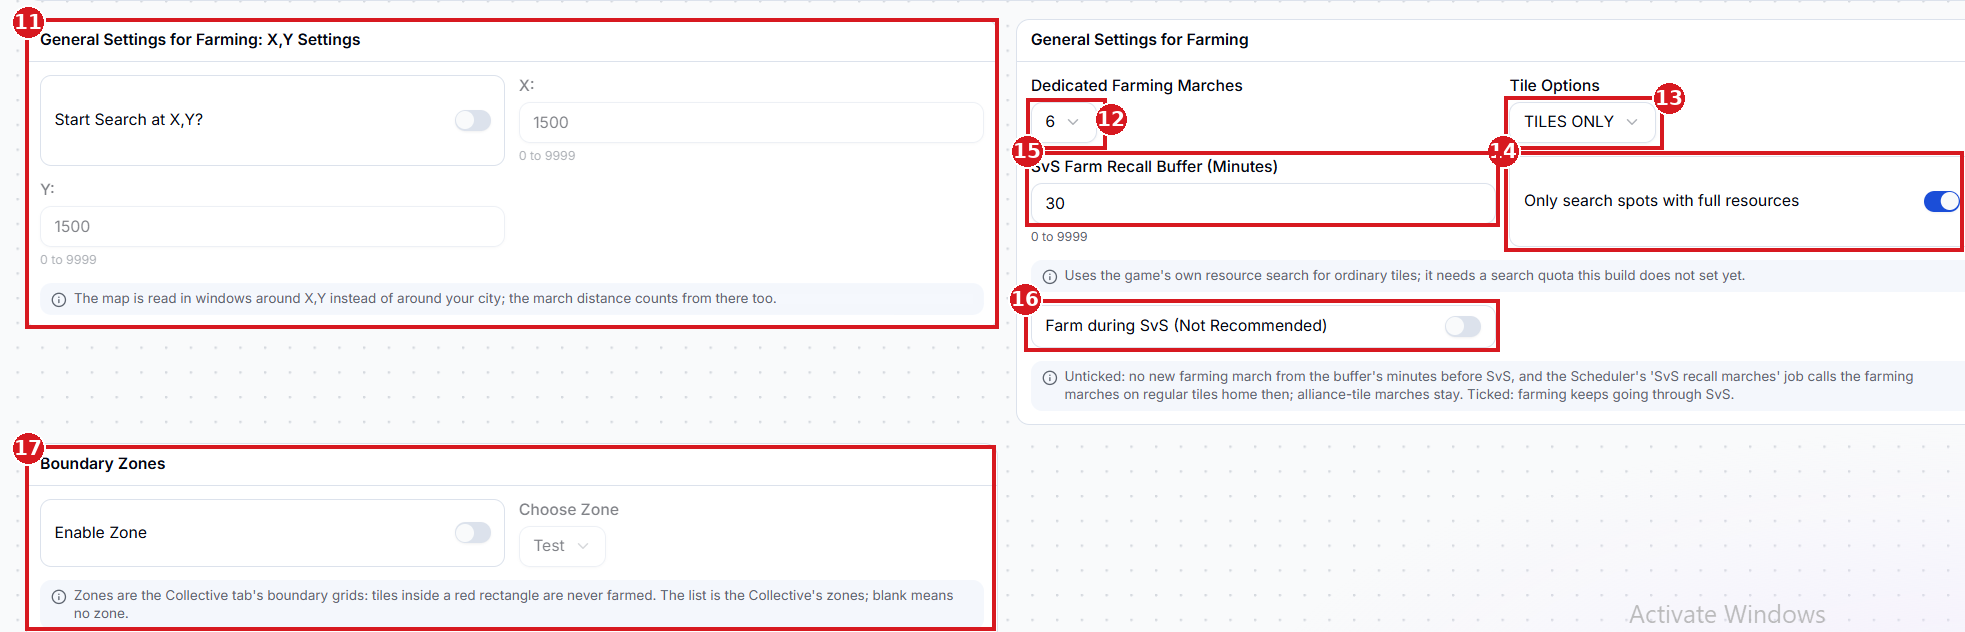
Start Search at X,Y? — Enter the coordinates you want Cloud to search around. Cloud reads the map and measures march distance from those coordinates. With the toggle off, Cloud centers the search on your city.
Dedicated Farming Marches — Set how many marches Cloud can dedicate to farming.
Tile Options — Choose where to send your farming marches.
Option Where marches go Tiles Only Regular resource tiles selected in Farming. Tiles and Alliance Tiles Regular resource tiles and your alliance resource tile. Alliance Tiles Only Your alliance resource tile. Only search spots with full resources — Limits Evony’s built-in resource search to full regular tiles. The Cloud build shown requires a search quota it does not yet set. Use Scan map while idle or iScout to find tiles.
SvS Farm Recall Buffer (Minutes) — Set how many minutes before SvS Cloud should stop sending new farming marches when Farm during SvS is off. The Scheduler’s SvS recall marches job recalls marches from regular tiles at that point. Alliance-tile marches stay out.
Farm during SvS (Not Recommended) — Enable this if you want farming to continue through SvS.
Boundary Zones — Create a zone in Collective, turn on Enable Zone, then select it under Choose Zone. Farming skips tiles inside the zone’s red rectangles.
Find farming tiles
Use Scan map while idle or iScout to populate the Collective’s Tiles queue. The farming account’s profile must use the same Collective key that receives the tile results.
Option 1 · Scan map while idle
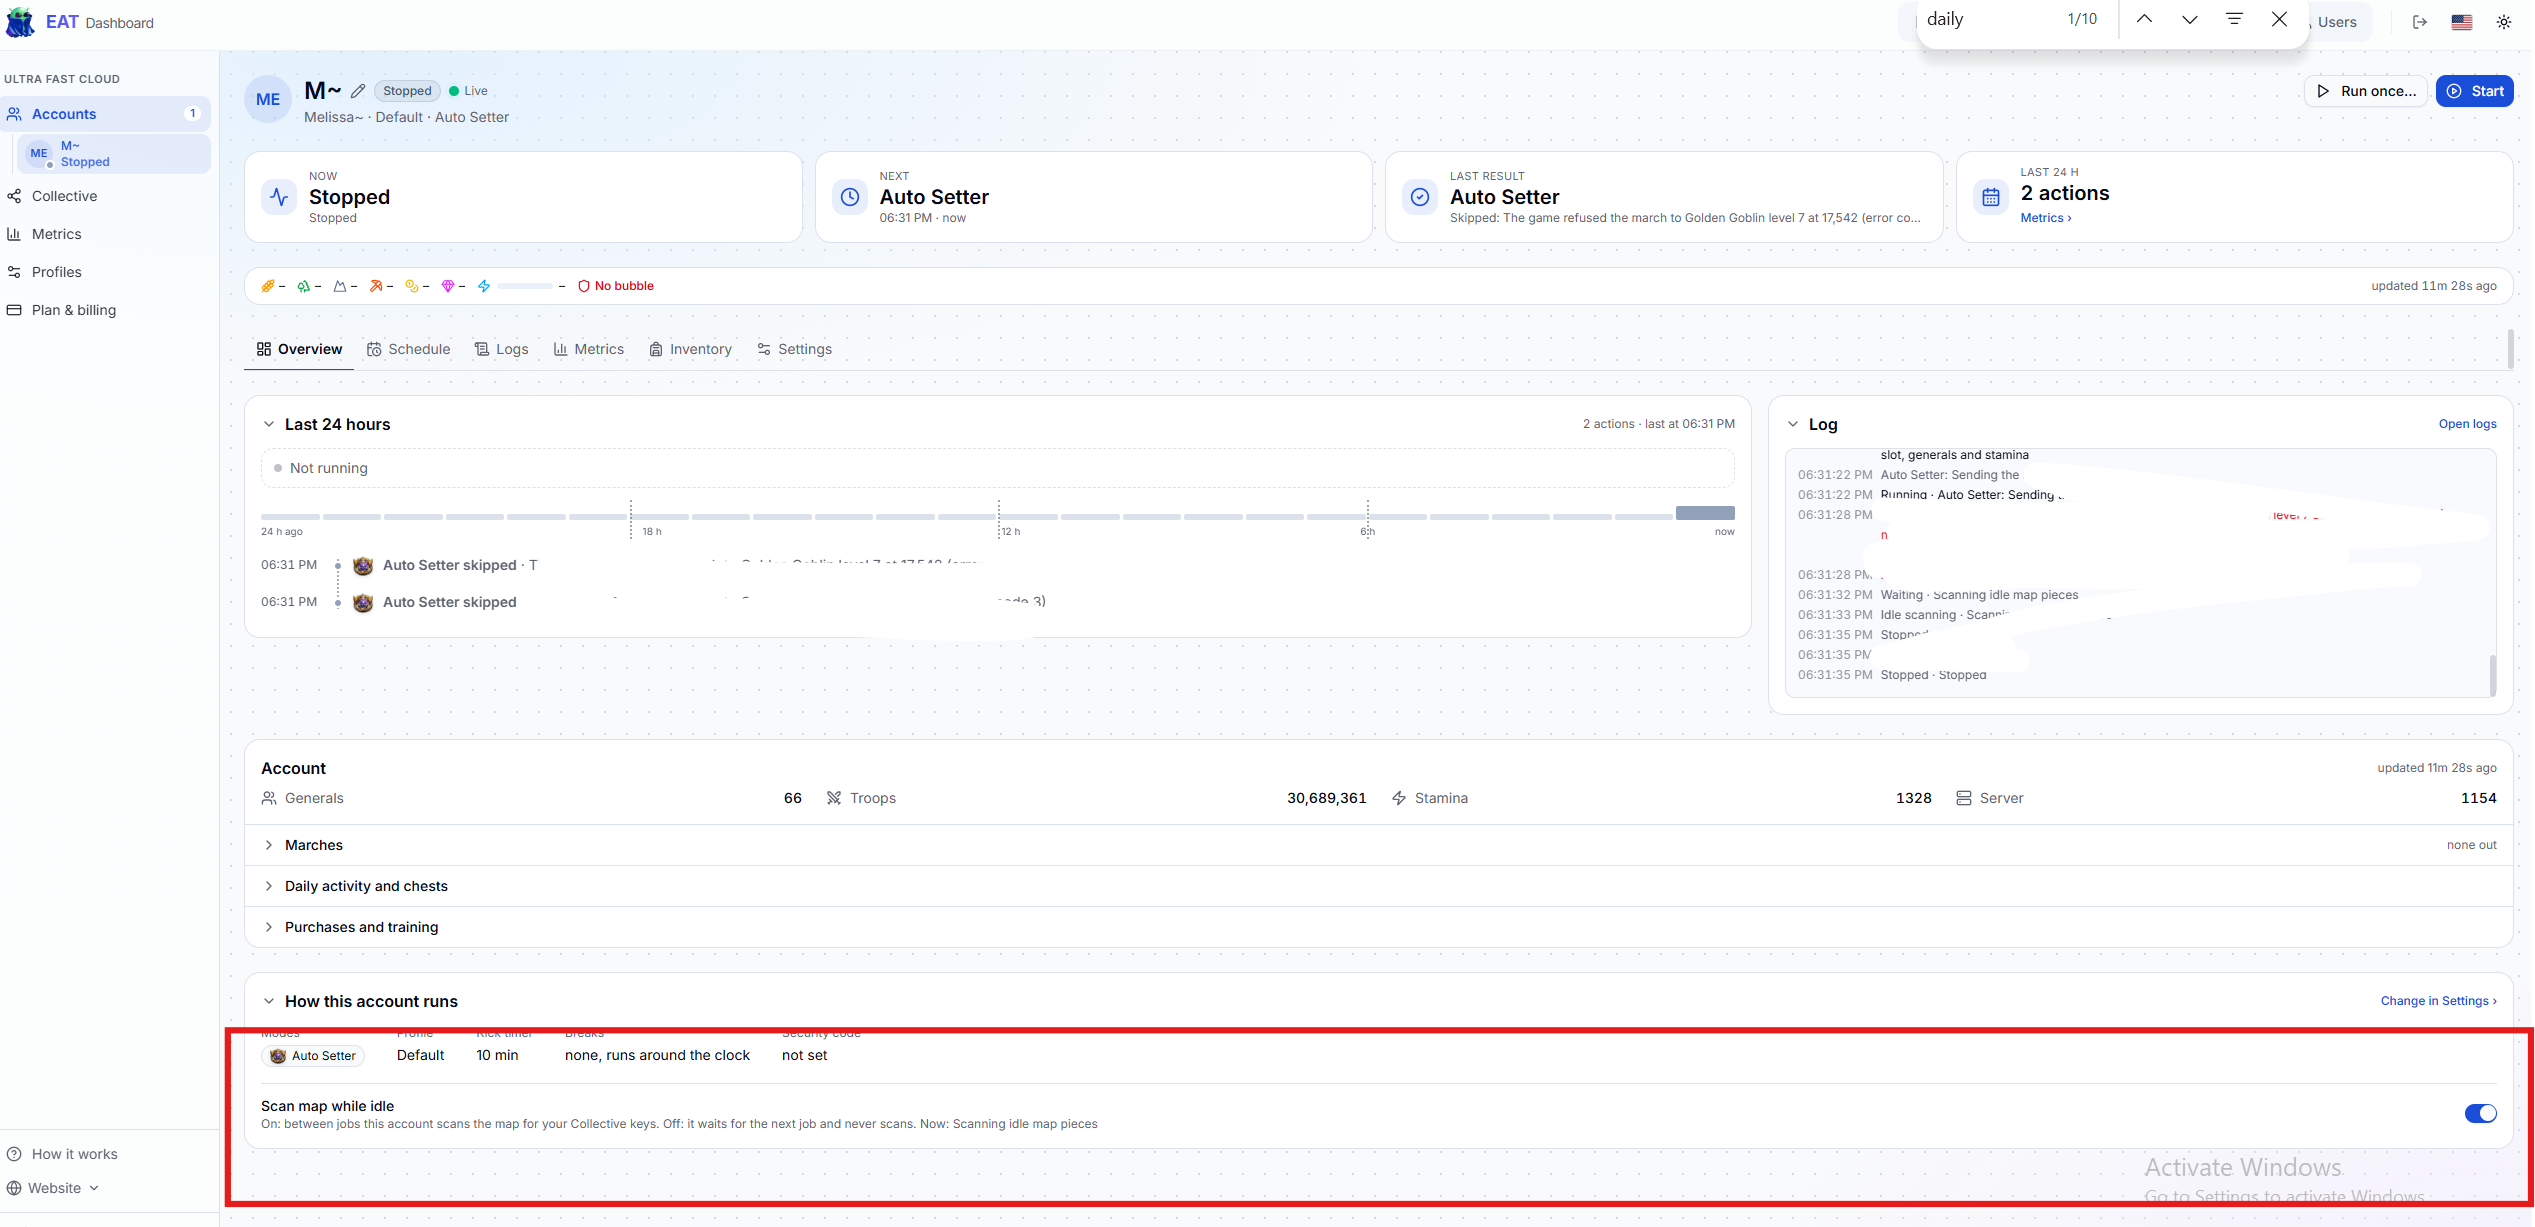
- In Accounts, select the account you want to scan with. Open Overview → How this account runs and turn on Scan map while idle.
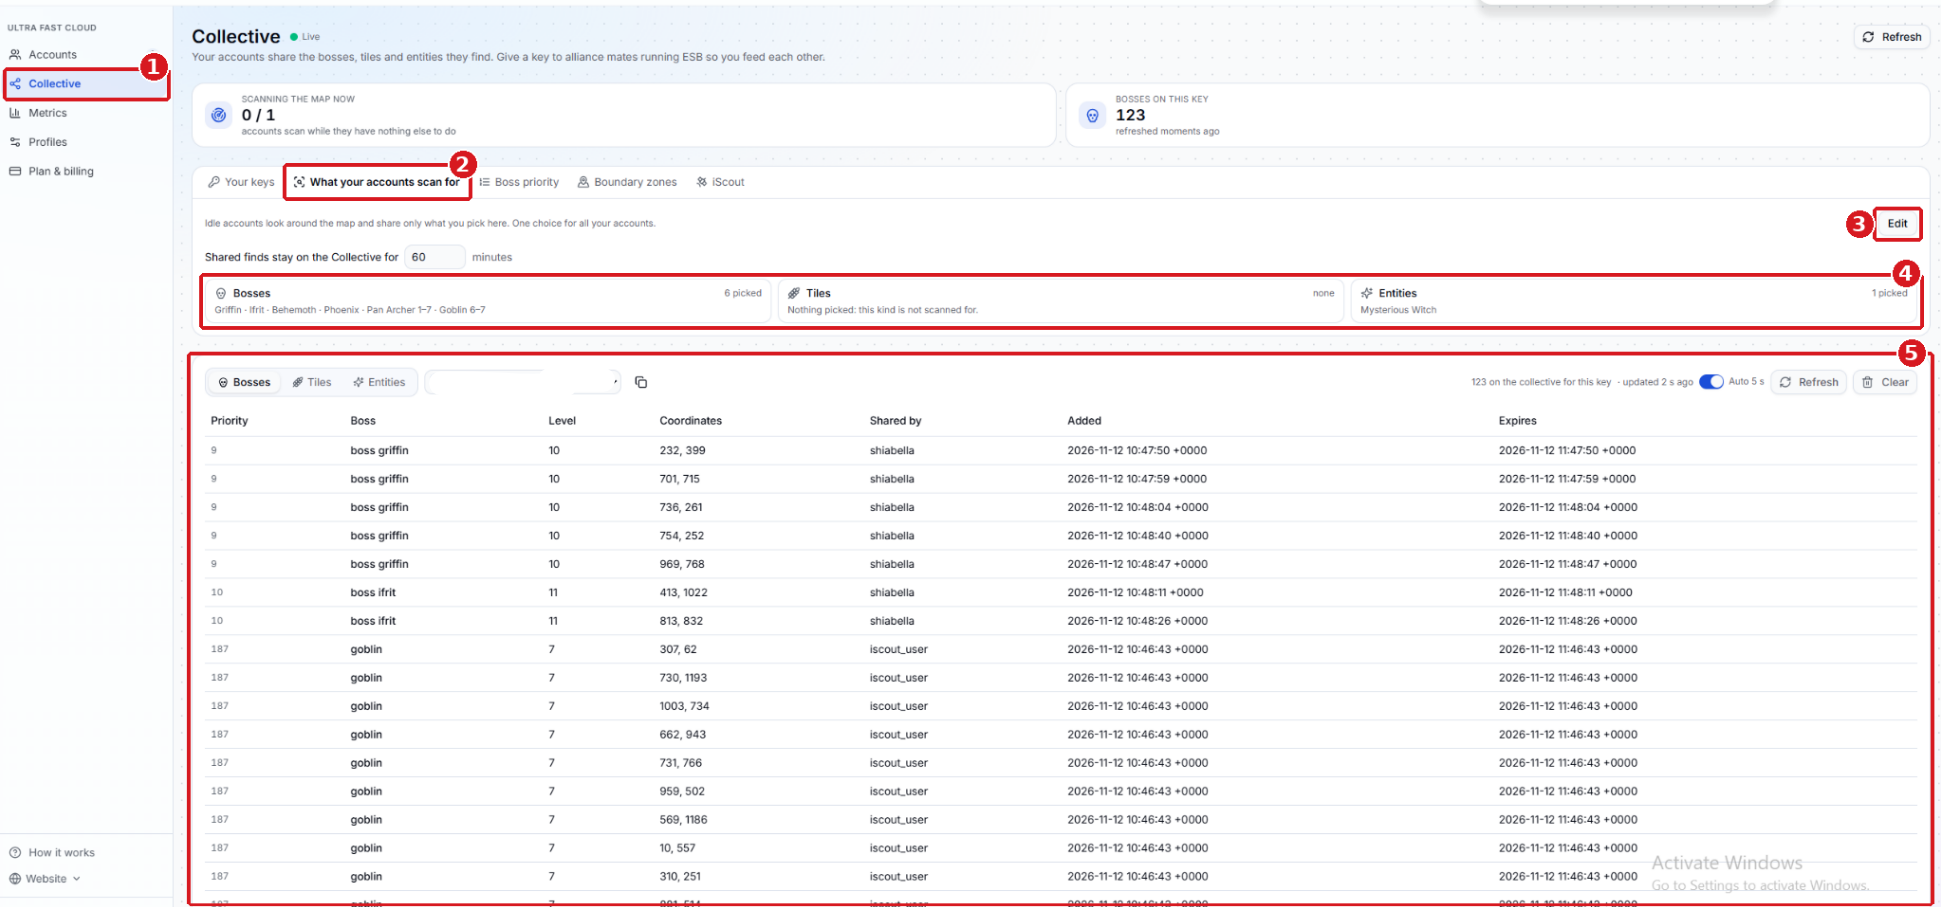
- Go to Collective → What your accounts scan for → Edit. Select the resource tile types and levels you want the scanner to find, then save. These targets are shared by your Cloud accounts. If Tiles shows Nothing picked, idle scanning skips resource tiles.
- In the scanning account’s Settings, open its assigned profile and expand Collective keys. Beside Tiles, select the key you want the scanner to share tiles to, then save.
- Start the scanning account if it’s stopped. Check its Logs for Scanning idle map pieces.
Scan map while idle screenshot · Collective scan targets screenshot
Option 2 · iScout
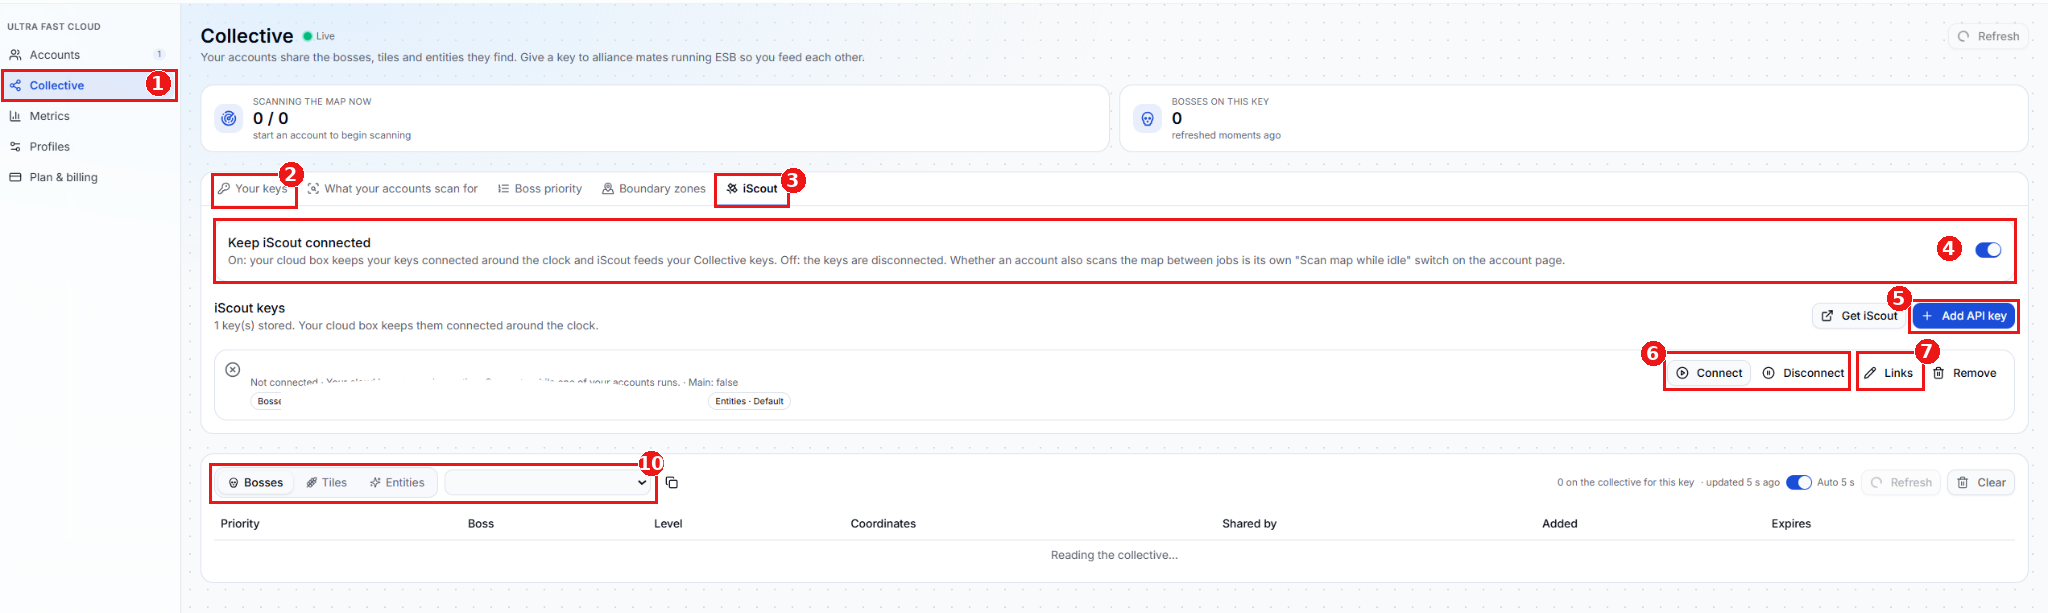
- Open Cloud → Collective → iScout. You’ll need an active iScout API subscription and an API key. Use Your keys to create a Collective key if you need one. iScout
- Click Add API key, enter your key, then click Connect if the status shows Not connected. Turn on Keep iScout connected to keep the feed connected around the clock. You can leave Scan map while idle off if you only use iScout.
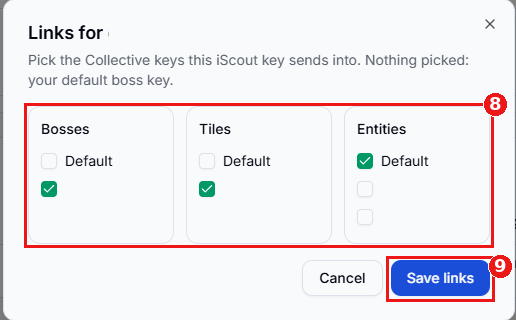
- Click Links beside the API key. Under Tiles, tick the Collective key that should receive tile results, then click Save links. Leaving every box unchecked routes data to the default boss key, so make sure your tile key is selected.
iScout connection screenshot · iScout Links screenshot
Match the tile key and verify results
- Open Collective → Tiles and choose the key used by the scanning account or linked under Tiles in iScout. Click Refresh or turn on Auto 5 s. Use Shared by to check whether tiles came from a Cloud account or iScout.
- In the farming account’s Settings, open its assigned profile and go to Collective keys. Select that exact same key beside Tiles, then save. Repeat for each farming profile that should use the feed.
- Check that the tiles in the queue match the resource types and levels enabled in the farming profile. If the queue is empty, check the scanner’s account status and tile targets or the iScout connection and Tiles link.
Save and check the first run
- Click Save in the profile to keep the Farming settings.
- Return to the account page and click Start. If you changed the mode while the account was running, stop and start it again after saving.
- Check Last Result or Logs after Farming runs.
If no march is sent, check that a farming march is available and that the Tiles queue contains a tile that matches your enabled type, level range, and resource settings. Check whether the tile is inside an excluded boundary zone or whether the account is in its SvS recall window with Farm during SvS off.